SHARE THE INTERNET WITH YOUR PUPPIS S1 AND MAKE IT PERSISTENT
If you own a Puppis S1 PC-VR Streaming Link Air Bridge AX3000 like I do, you’ll know how great it is for playing VR Games on your Quest 2/3/Pro/Pico 4, etc. without wires. Buying the Puppies S1 and getting it delivered is one thing. However, getting it to work at its full potential is a different story.
Here’s a small guide to make it work with Windows 11 24H2 and above. If you have an inferior version of Windows 11, then PrixsmXR has provided This Script. Run it as an Administrator, and it will make your Puppis S1 work just fine after connecting it to your computer via its supplied USB-C cable. That script however will NOT work in Windows 11 24H2 and above and will break your internet connection. This has happened twice for me lately, and I was wondering why because I used the script in the past with no problem at all. Then I realized that I had updated my Windows 11 to its pre-release version, 24H2.
If you are in this pre-release version of Windows or above, DO NOT use the above script, or it will break your internet connection, and you’ll most likely need to re-install Windows unless you have a backup.
Also, I want to make it clear that I’m not here blaming PrismXR for anything or implying their software is faulty. As of the date of this writing, I’m using a Pre-released version of Windows, and the issue mentioned above might or might not be related to the PrismXR script. It could also very well be related to a bug in Windows 11 v24H2 and this problem might not be present in future versions.
WARNING: Please be aware that this tutorial contains instructions to make a change to the registry. Improper changes to the registry may prevent Windows from booting up or becoming unstable. DO NOT follow this tutorial unless you feel comfortable making changes to the registry. It is strongly recommended to make a registry backup or full system backup before proceeding
Enable Internet Connection Sharing Manually
Internet Connection Sharing (ICS) is a built-in Windows feature that allows multiple devices to connect to the internet using a single computer’s internet connection. It’s a type of local area network (LAN) that’s designed for small offices or homes where only one computer has internet access. ICS turns that computer into an internet router, allowing other devices to connect to the internet without installing additional software.
So this guide will do exactly what the script mentioned above does, enabling Internet Connection Sharing with your Puppis S1 and making it persistent throughout reboots, but we’ll make it manually and will not break the Internet connection in the process. Simply follow the following steps exactly as described below.
1. Open the Power User menu by pressing Windows key + X
2. Select “Network Connections”
3. Scroll down to “Advanced Network Settings” and click on that to see all your available network connections.
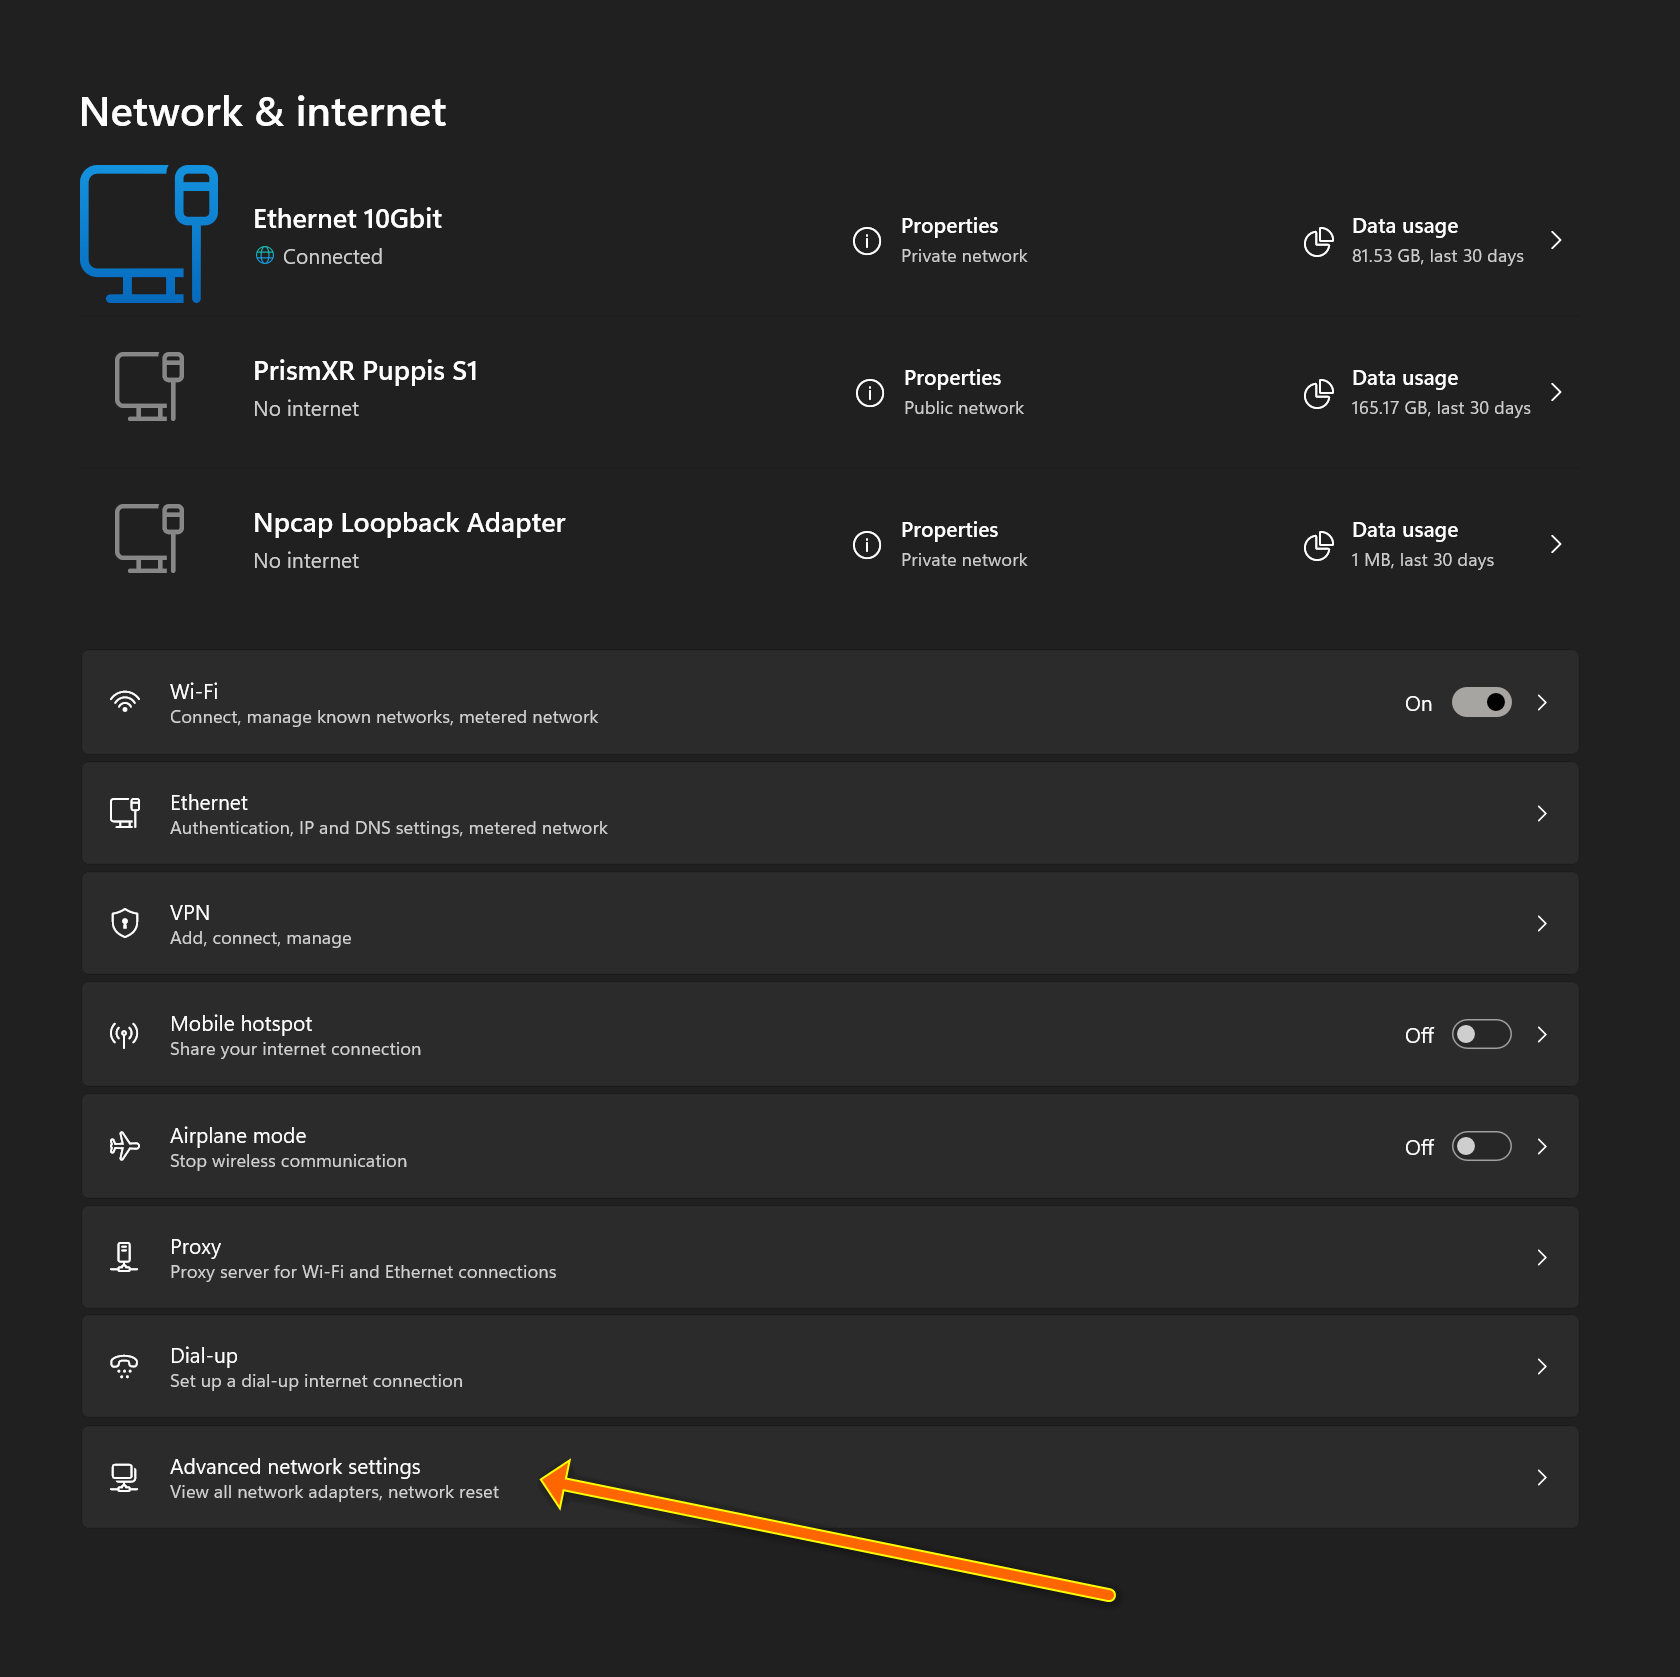
Now you need to identify the name of your main Ethernet Adapter on your Advanced Network Settings page you opened in the step above. In my case, the name of my adapter is “Ethernet 10Gbit”
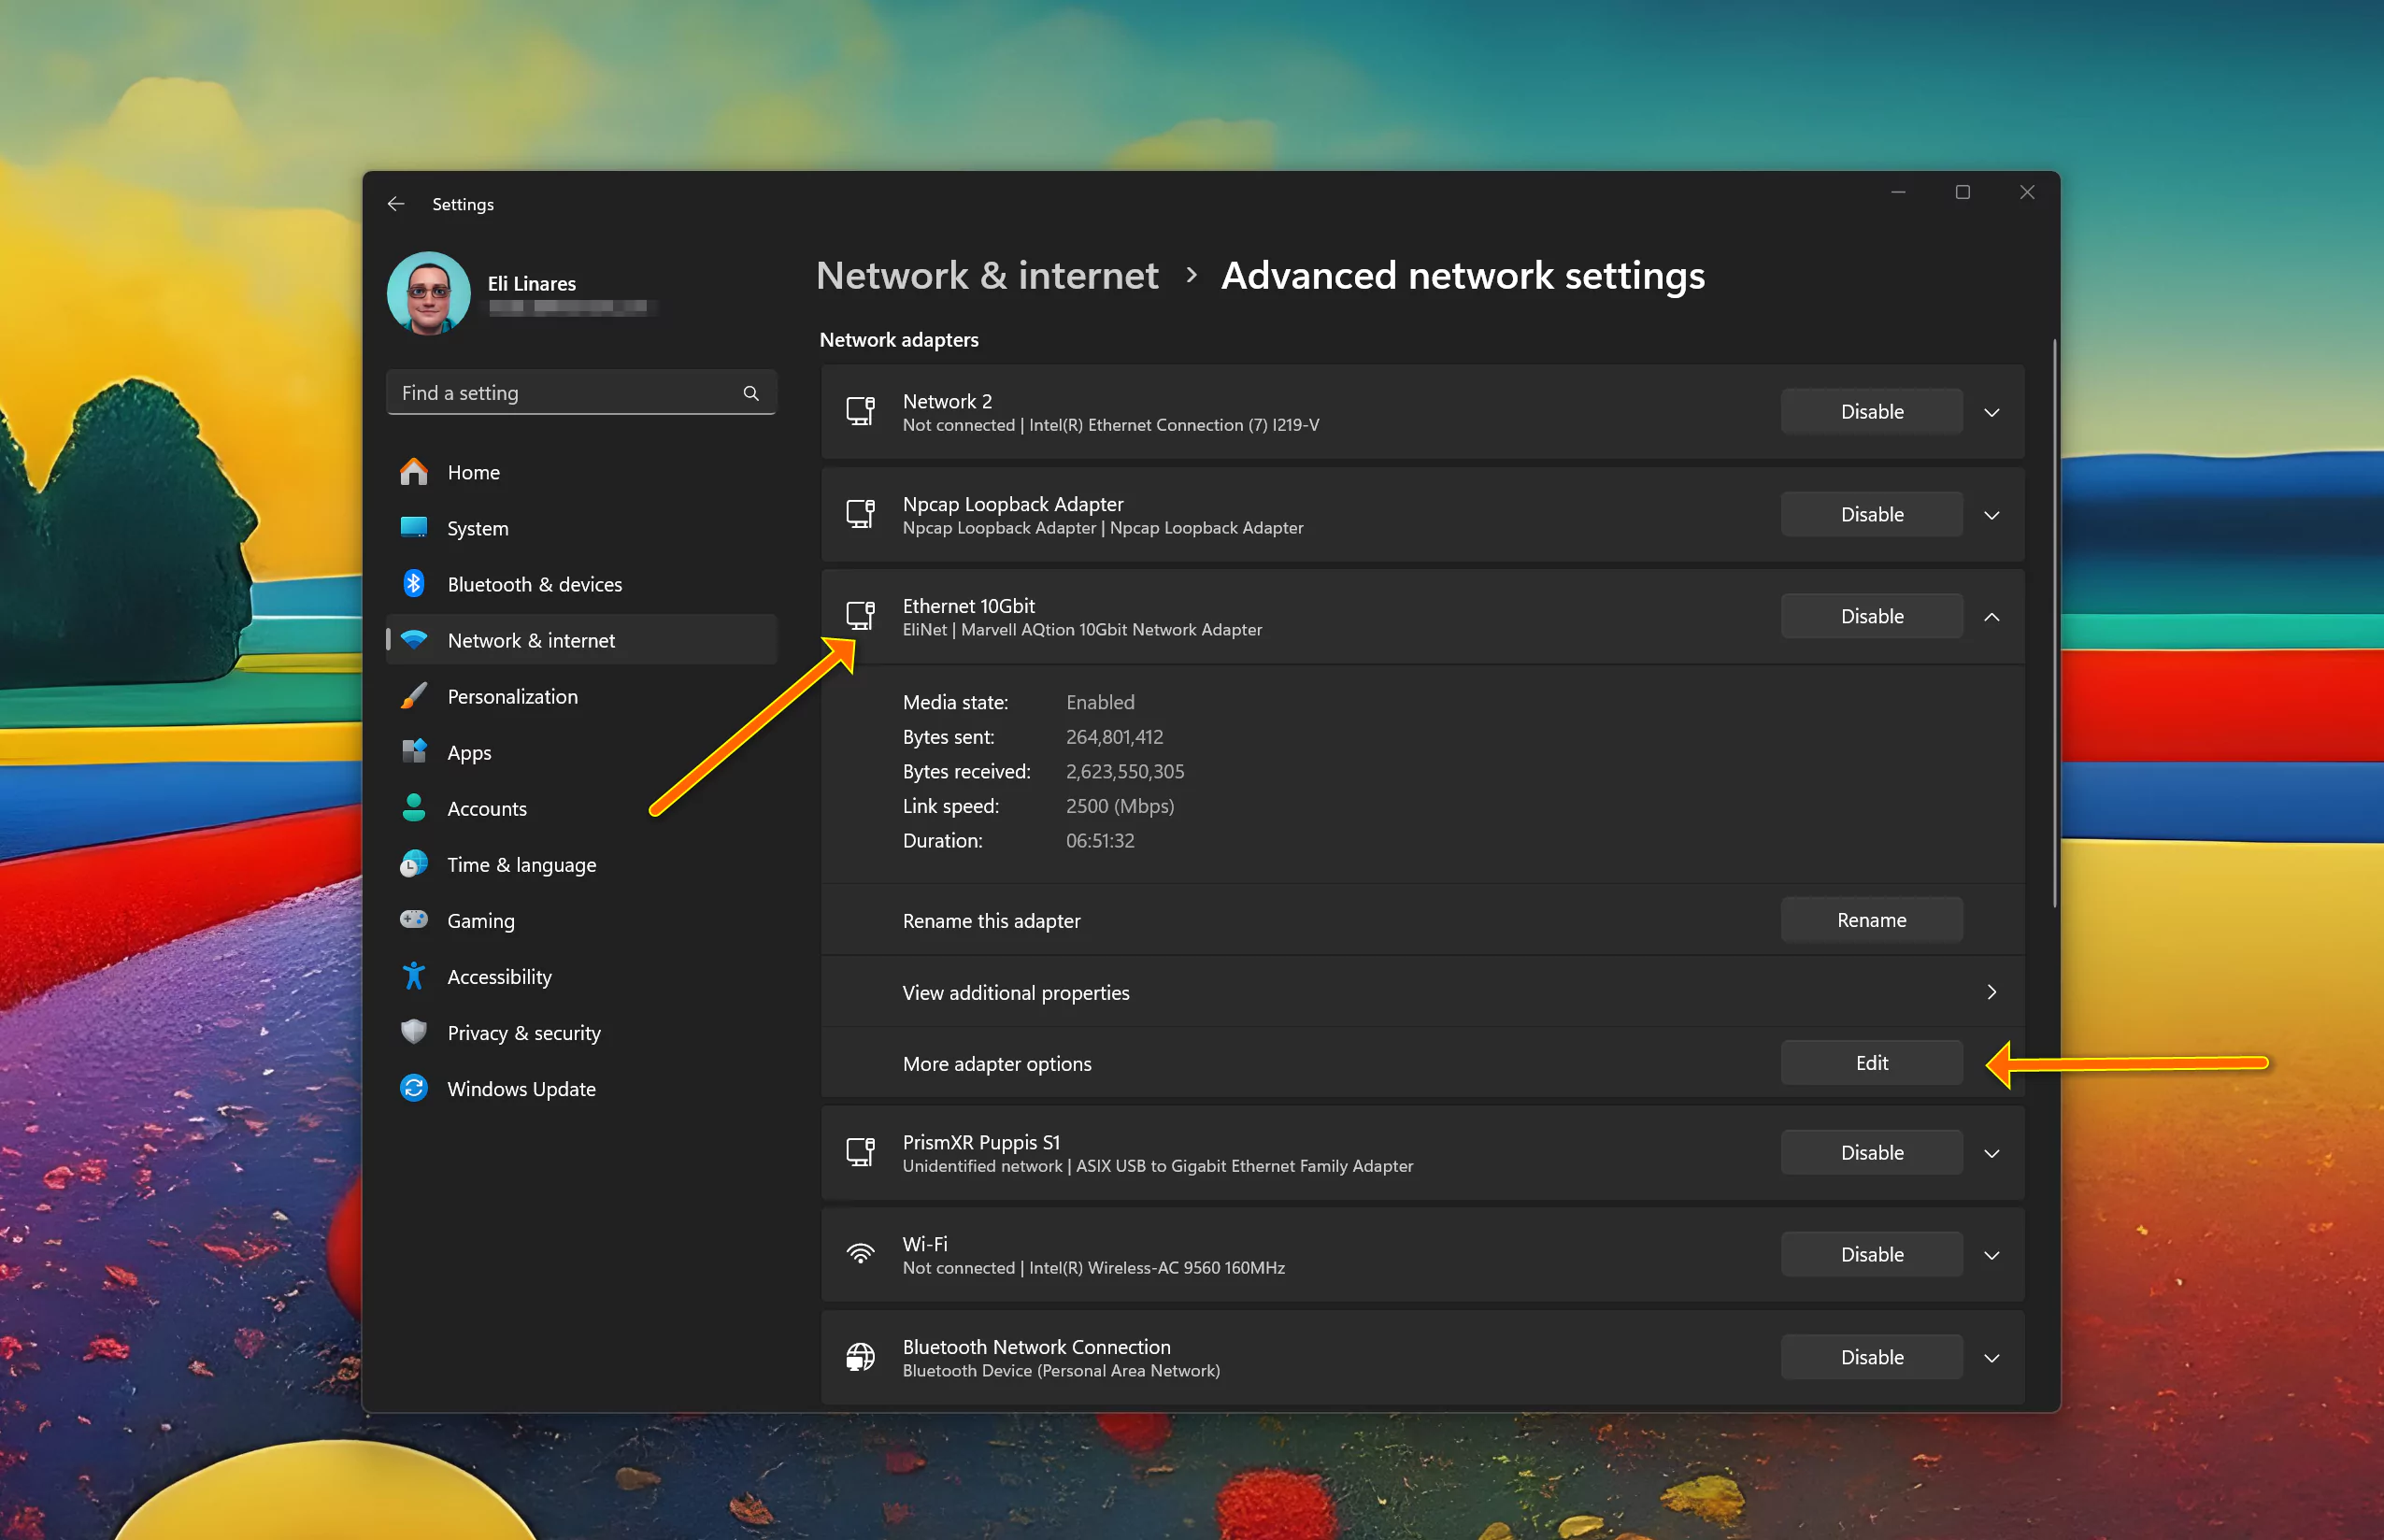
4. Once you identify which your Adapter is, click on the arrow on the left to expand the tab.
5. Now once expanded, towards the bottom, on the section for “More Adapter Options” click on “Edit”.
6. A new smaller window will open on that window, move to the “Sharing” Tab and then make sure that “Allow other network users to connect through this computer’s internet connection” is selected. Also, select the option for “Allow other network users to control or disable the shared internet connection”.
7. Between the two options above, there is yet another option for “Home Networking Connection”. Make sure that “PrismXR Puppis S1” (Or whatever the name of your Puppis S1 in your PC is)
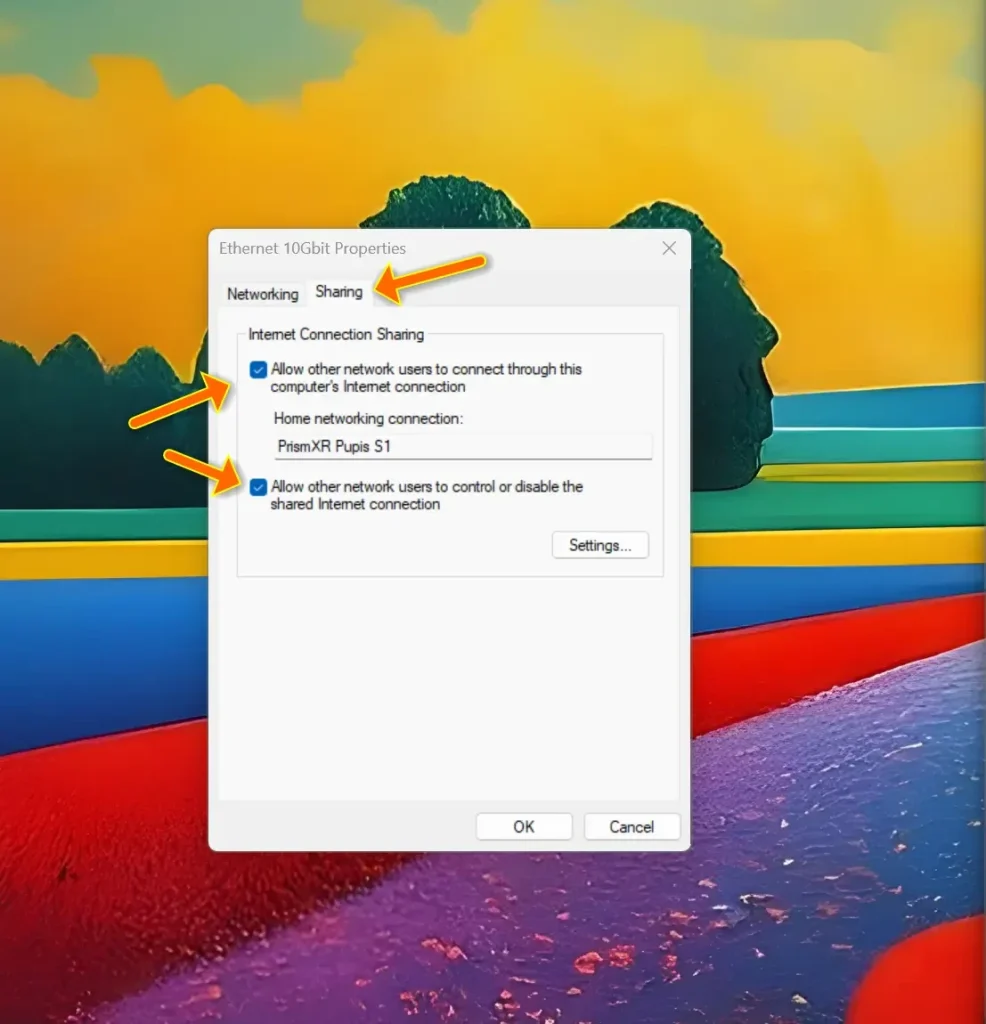
You have now finished the first part of this tutorial, and your internet is set to be shared with your Puppis S1, however, we are not fully done yet. Windows 11 24H2 and above requires some extra steps so once you reboot your PC the Internet Connection Sharing is started and initialized automatically.
Now Let’s Make The Internet Connection Sharing Persistent Between Reboots
Now, up to making the steps above stick even after you have rebooted or shut down your computer. To get this done, we need to make ICS start automatically. Additionally, we’ll need to make a small change to the registry.
1. Open the Power User menu by pressing Windows key + X
2. Select “Run” and in the small window type “services.msc” (without the quotes) and press Enter.
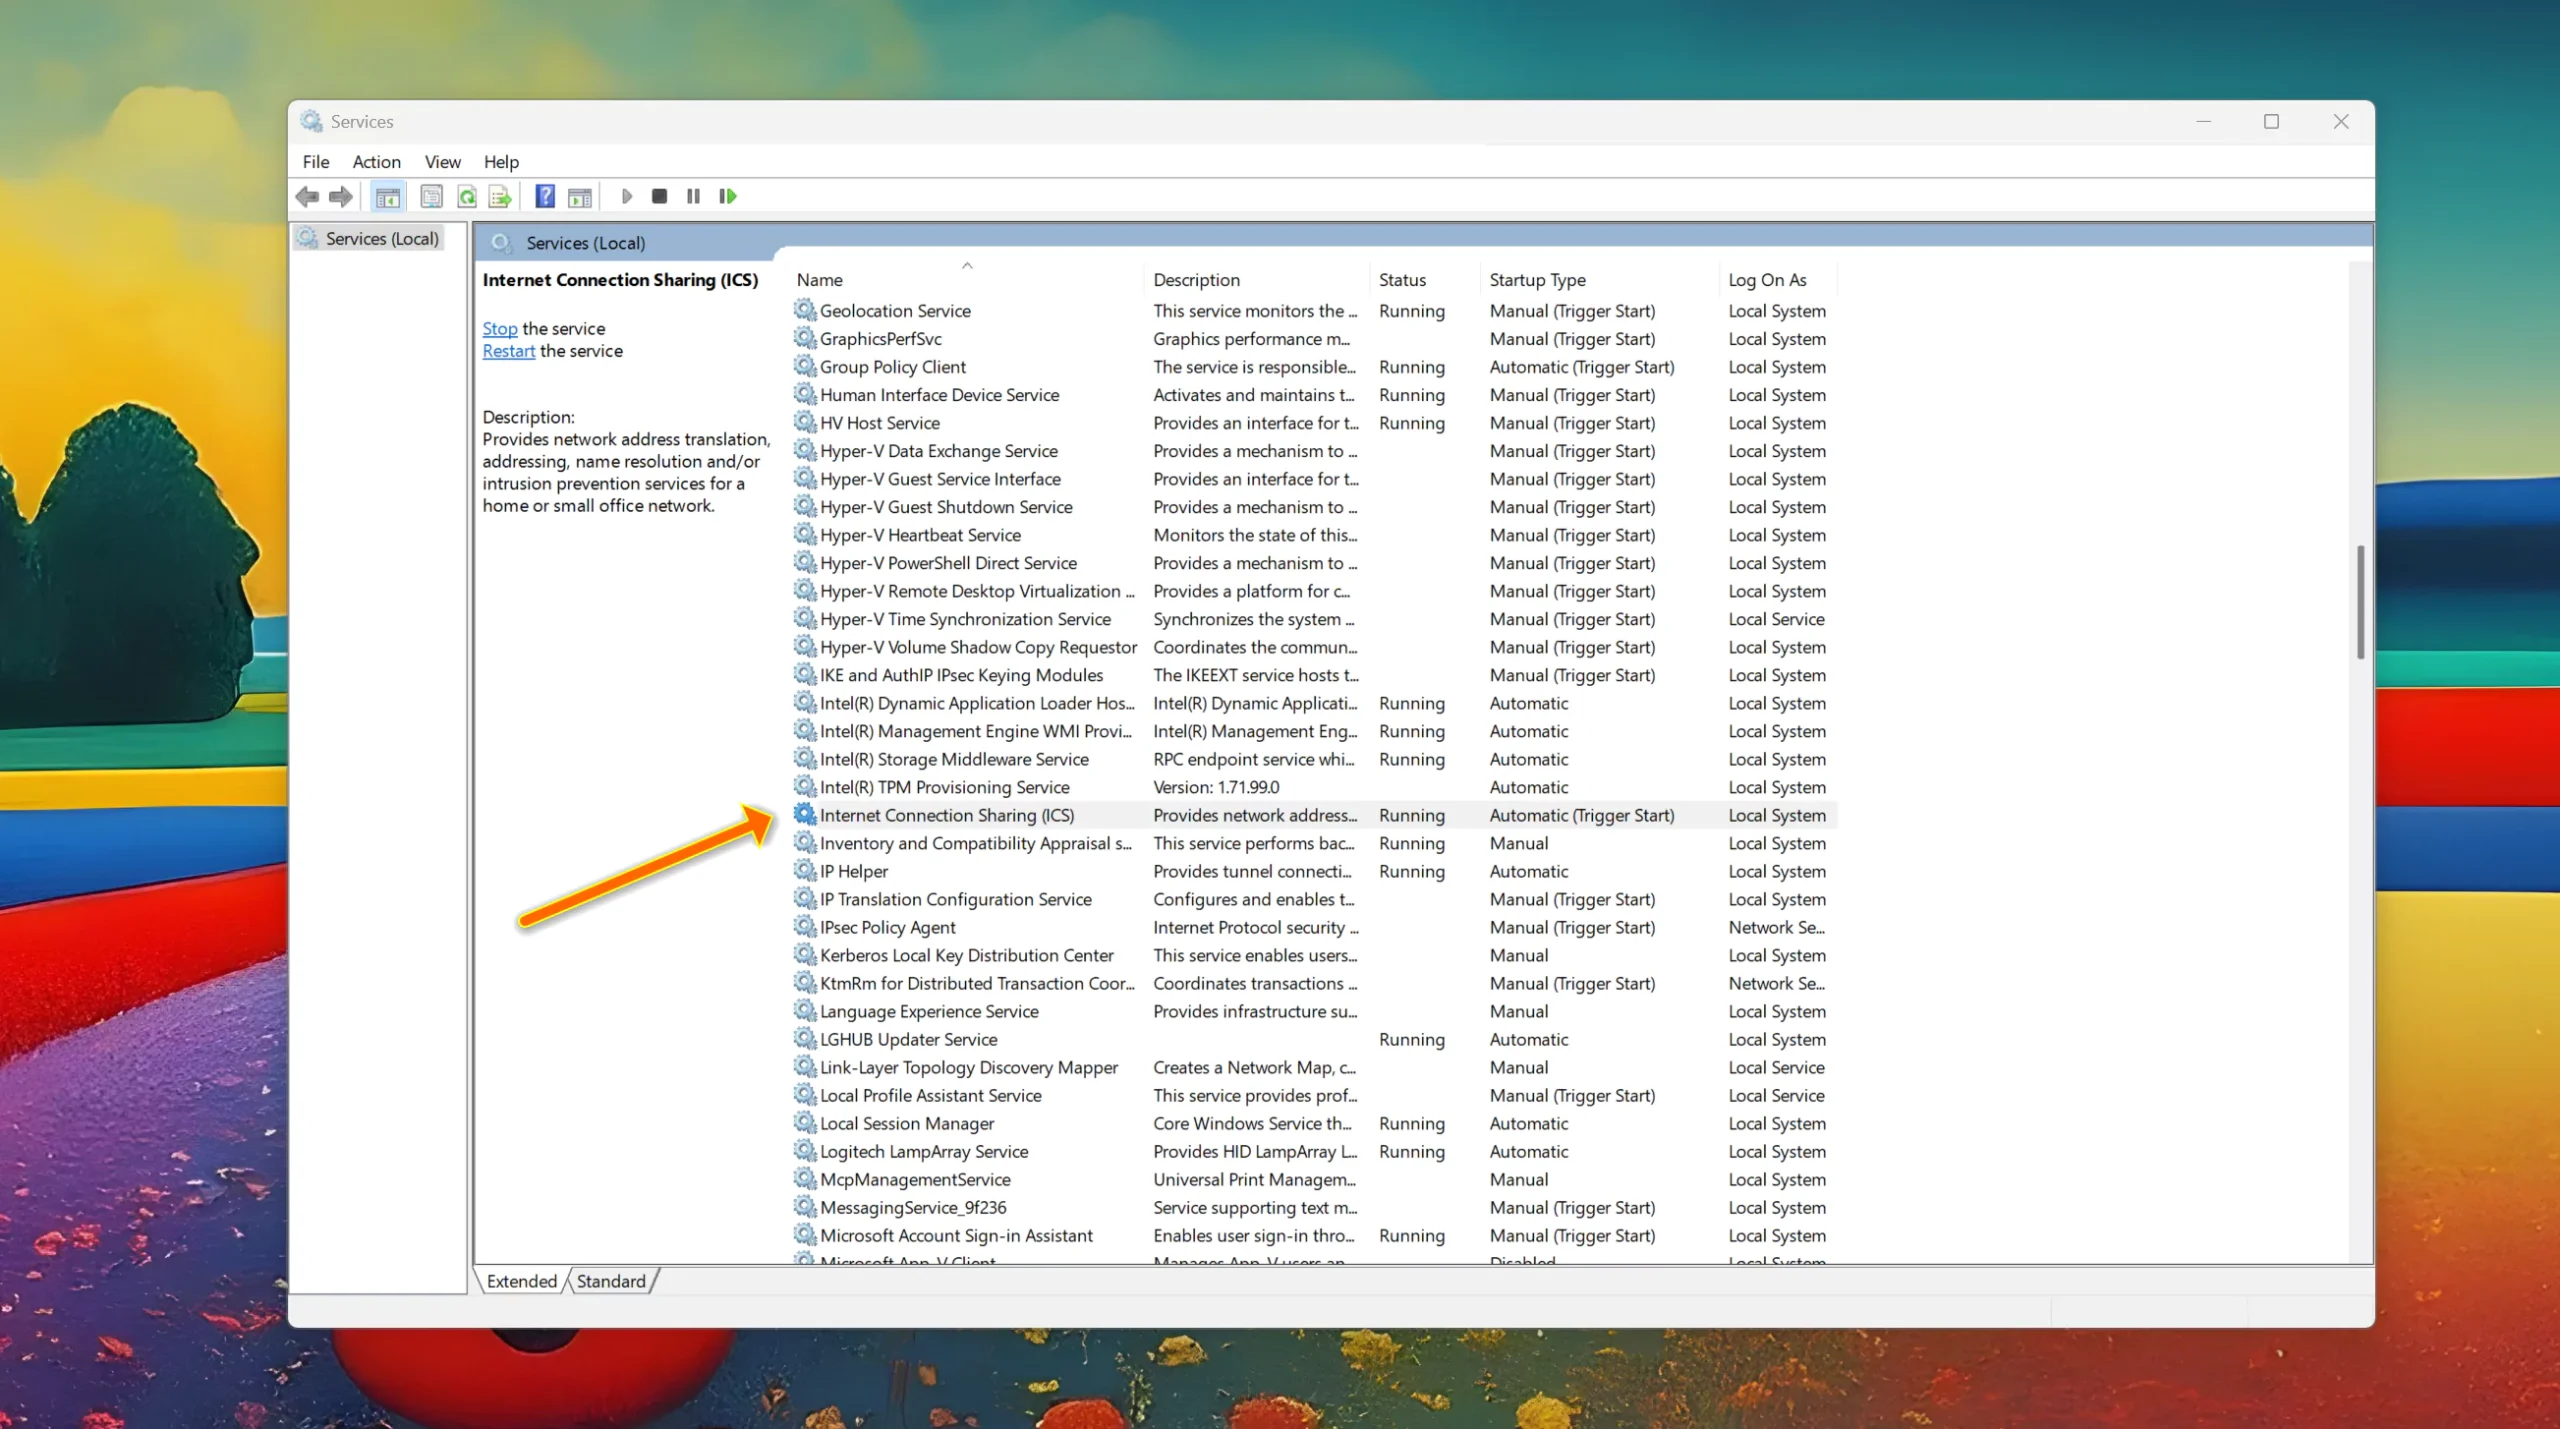
3. The Services Window will open, on that window look for and right-click on “Internet Connecting Sharing (ICS)” and select “Properties“.
4. Now on the new smaller window and in the “General” tab, make sure that you change the “Startup Type” to “Automatic“.
You have now finished the second part of this tutorial, and your Internet Connection Sharing ICS should be persistent between reboots.
Small Change To The Registry (Be Careful!)
Now we will add a small change to the Windows registry, so finish your setup. Please be aware that making incorrect changes to the registry can cause your computer to stop booting up or Windows to become unstable. So proceed with caution, and you should not attempt doing the following step unless you feel comfortable making changes to the registry. It is recommended that you back up the registry before proceeding to the following steps or, better yet, perhaps do a full system backup just in case. With that fair warning out of the way. Let’s continue.
1. Open the Power User menu by pressing Windows key + X
2. Select “Run” and type: “Regedit” (without the quotes) and press enter. Windows will ask you for Admin privileges, click on “Yes” to continue.
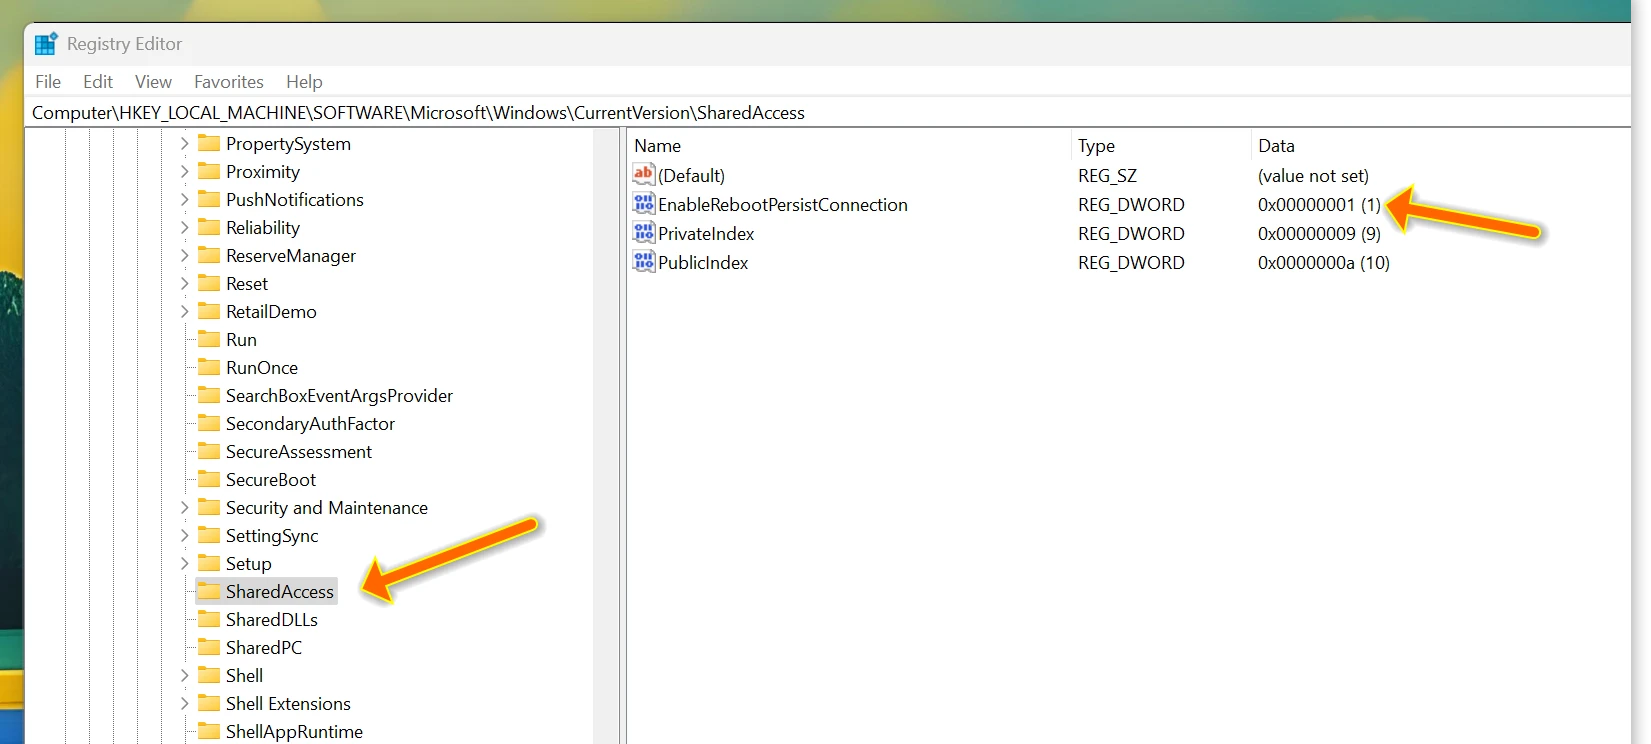
3. Now look for and navigate to: Computer\HKEY_LOCAL_MACHINE\SOFTWARE\Microsoft\Windows\CurrentVersion\SharedAccess
4. Once you have located the key “SharedAccess” select it on the left.
5. Now click anywhere on the right side and right-click anywhere on the empty area and select “New” then “DWORD (32-Bit) Value“.
5. Name the new value as: EnableRebootPersistConnection
6. Now right-click on the new value you just created in step 5 and click on “Modify“.
7. On the “Value Data” field, make sure to change from 0 to 1 then click on OK.
8. Now close the registry editor and reboot your PC.
The setup is now finished, and you should be able to have a persistent connection shared with your Puppis S1, Even after your PC is rebooted.
If you find any mistake or believe a correction or clarification needs to be made, feel free to leave a comment below. Happy playing!


